Back in 2020 during the midst of a lockdown, our friend, Emma over at Live The Wild Scotland purchased a Ford Transit Custom which she wanted converted into a campervan. She contacted us at So Far So Wood to do all the woodwork which including lining the van and installing the custom build kitchen, benches, shelves, cupboards etc...
She decided to rent it out over the summary and you can book this online with her in the link below
I hope in this blog to explain what we did. In the end, I think we were both quite pleased with the end result:

The Beginning
First thing we needed to do was remove all the old plywood lining, shelves and check for rust. Most of these were riveted into the van wall and occasionally there were some screws. To remove the rivets all you need to do is drill them out and they'll pop off.


Lesson 1: Templates!
Probably one of the biggest mistakes at the beginning was taking the removing the old lining and placing it in the skip! KEEP THE OLD LINING as a template. It is incredibly easy to get the old template and clamp or screw it on to a fresh piece of plywood and use a router with a trim bit to cut the template. Ended up using cardboard and lots of offcuts and it took a while.

Insulation
Anyway before this was done, we started on the insulation. All the products were from the Dodo brands and there are plenty of decent tutorials and opinion online about insulating a van. My tip: cover every mm of exposed metal!
Floor: Dodo Super Liner 6 mm
Walls, wheel arches and roof: Combination of - DodoMat Hex sheets, Dodo Thermo Fleece and Dodo Thermo Liner Pro

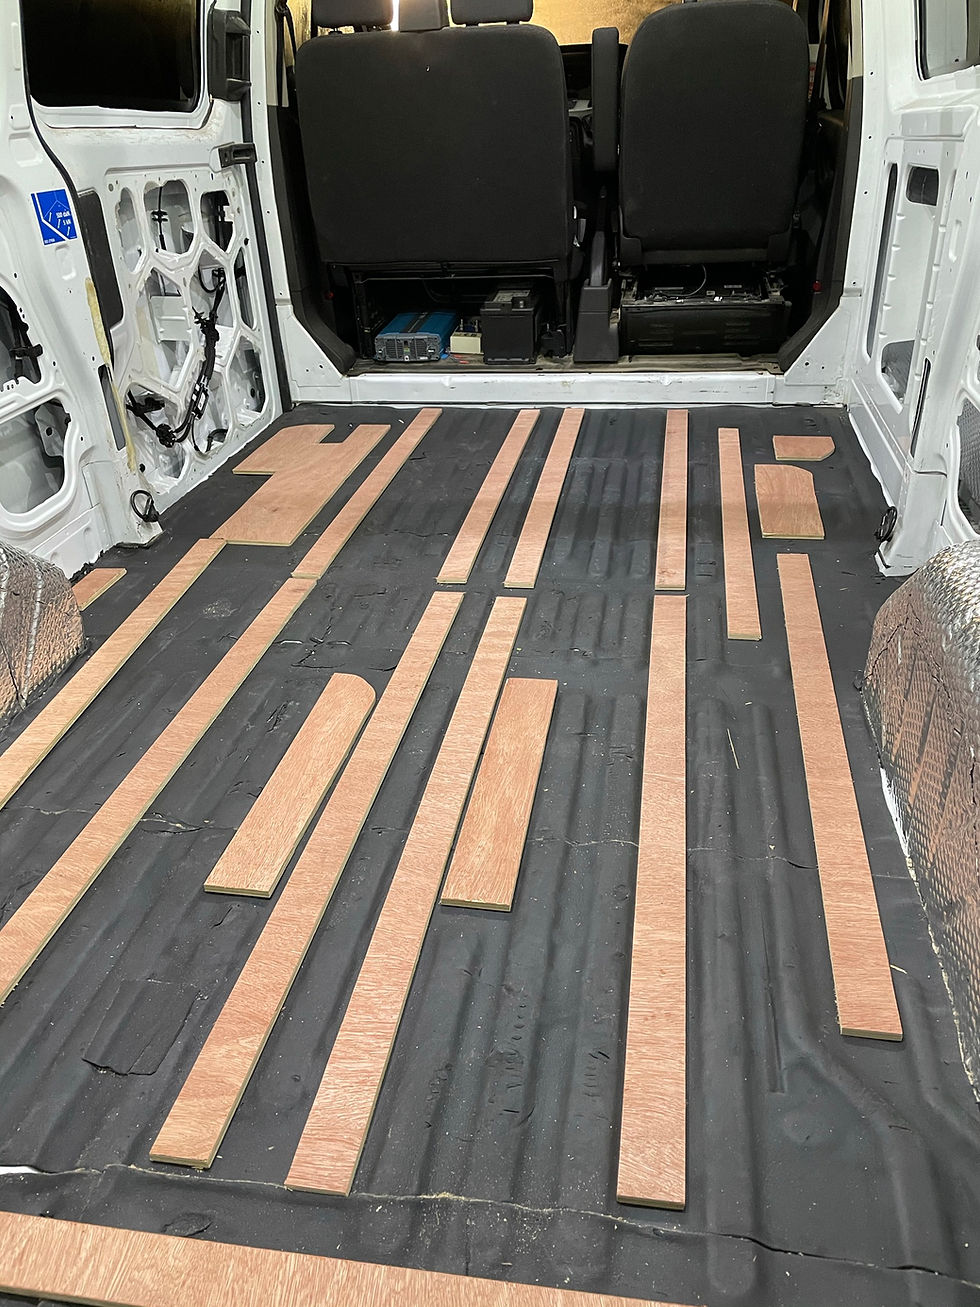
Floor
As I mentioned previously, I really shouldn't have thrown away the old templates for the floor. However, we a number of templates we finally managed to get a floor down. We used 12 mm hardboard plywood from B&Q. Off cuts were used in between the grooves to support any dips which were simply glued down to the DoDo sheeting.
A little note on securing the flooring. We used screws. A lot of folk online do not and prefer the timber baton approach with glue but this removed a bit of the headroom. The underside of the van was getting sealed at a later date and in the end the flooring was a snug fit that we only used a handful of screws.
The initial plan was to use stainless steel self drilling screws* as it would not corrode - however despite drilling the correct pilot hole these continually snapped and were a nightmare. In the end, we used self tapping carbon steel screws which have a higher strength - however I still drilled a pilot hole.
*self drilling means :you need a pilot hole
** self tapping means: you probably don't need a pilot hole, but I'd do one anyway!

Spare wheel
In the Ford Transit Custom, the spare wheel is underneath the van. It is accessed from a plug that you wind down to release it. From the pictures above, it is clear the floor goes all the way to the door. A lot of other designs have this further back into the van and you can purchase plastic trips readily on Ebay. This wasn't done here because we like to make things a little more challenging. So we made a small hole and a cap that can be lifted off. In the end this turned out to overkill and after we put laminate flooring down, we ended up using a plastic plug - you'll have to keep scrolling to see this.
At this stage, some people put the laminate flooring down and then insulate the walls and do the cladding, but every millimetre counts, so let's save that until we get really good at scribing!
Bulkhead
The original bulkhead was removed. It is an awkward shape - which when you then decide to try and build a bulkhead you understand why. The seats actually sit about 60 mm into the rear of the van, so to get round this we staggered the bulkhead. Two sheets of 12 mm plywood were used, however these were screwed into two timber batons which were secured directly into the frame of the van where the original bulkhead was. The plywood sheets were connected with glue and pocket holes.
The parcel shelf was also replaced with 12 mm plywood. A CLS timber beam across the top of the van was secured into the metal frame and both the shelf and the bulkhead was attached to.


Scribing
For the bulkhead and other aspects of the van, there is a lot of scribing involved. Our first attempt was to simply use an offcut of wood with a nail and secure a pencil in place which worked pretty well. Later on we used a variety of things such as washers and other Scribe tools.


Cladding
Before installing the cladding, we used 12 mm strips which were screwed directly into the frame of the van using self tapping screws. I always had much better luck drilling a pilot hole due to the varying thickness of the metal sheets throughout the van.
Lesson 2: Buy lots of spare drill bits. They will break and then the ones you buy will break again.
Started on the ceiling and used 12 mm plywood strips drilled directly into the metal trusses on the roof. The high top Transit custom has an awkward part of the roof which is a 'lip' all the way around. It is as if Ford take a normal low top and simply pop on the higher roof. To allow for the cladding to flow seamlessly down the walls, this had to be filled with thicker wood. As shown in the picture below.

To attach the thicker timber to the frame of the van, we used a Rivet nut tool to provide a strong fix. Clamped the timber in place and predrilled the appropriate sized hole, removed the timber and used the Rivet nut tool to secure the nut.


We started with the 7 mm pine timber cladding on the roof and worked our way down the van. Two coats of danish oil was applied to the front and the back of the cladding before it was installed on the ceiling. For the wall, this process was repeated but was painted on both sides instead.
The cladding was installed with standard wood screws into the batons. The holes were first pre-drilled which allows for any movement of the wood due to expansion / contraction.


Preparation of the window
As with the rest of the Transit Custom, there are curves everywhere and that includes the windows! They aren't square either - more of a trapezoidal shape - larger near the front of the van and shorter towards the rear. We ended up using off cuts of wood and screwing these directly into the frame to give a support for the window frame as shown in the pictures below.


Benches and bed
The layout of the bed and benches was all made from 15 mm birch plywood. Good old pocket hole joinery holds it all together. The benches sit above the wheel arches and three section of wood go between the benches to create the bed. The bed is secured into the plywood floor and also secured using Rivnuts into the wall.


Bench dimensions
Renderings and dimensions of the bed are shown below.
For the two benches and bed section, three sheets of 15 mm birch plywood were used.
Each bench uses a full sheet of plywood and then a further sheet is required to create the bed section. The height can be adjusted based on the desired size of cushion. We used 100 mm for this design.


A PDF version can be downloaded here:
Kitchen
The kitchen was all constructed from 15 mm plywood sheets with some lovely pocket hole joinery. Kitchen doors were constructed using inlay doors and painted white. To figure out the spacing, Blum have an excellent website that allows you to download the hinges and design the units which really helps. The catalogue is really good too once you get the hang of it.
To get the correct spacing, I used an excellent wee tool from Blockscribe. It was an inset jig which allows you to mark the correct spacing - however for this application, the width was 15 mm - so you can use 3 mm spacers and offset the 18 mm holes to get the markings correct.
A solid wood worktop was then installed. Holes were cut out for the Belfast sink and gas cooking hob. We used Osmo Top Oil to finish the worktop and will be periodically treated once a year.


To secure the kitchen units, we used 'n' shaped blocks which were secured into the floor with pocketholes and screws. The kitchen units were then directly screwed into these blocks.

Flooring
Once the kitchen was installed and all the painting was finished, the laminate flooring with built in insulation was installed. For the majority of it we used the Profiler scribe tool.


Gas install
The gas was installed in accordance to the guideline stated with BS EN 1949:2011 which specified that the gas must be in an air tight box, have a drop vent and the drop vent is not positioned near any hot exhaust pipes. This includes drop vent sizes and everything you should need to know for your application. We are not gas engineers but this installation was later checked and signed off by a gas safe engineer. If you are doing it yourself, please download the latest standard and check the guidance.
We created an air tight box by using a combination of silicone and screws. For the lid, we used weatherstrip tape and pull latches.


Comments